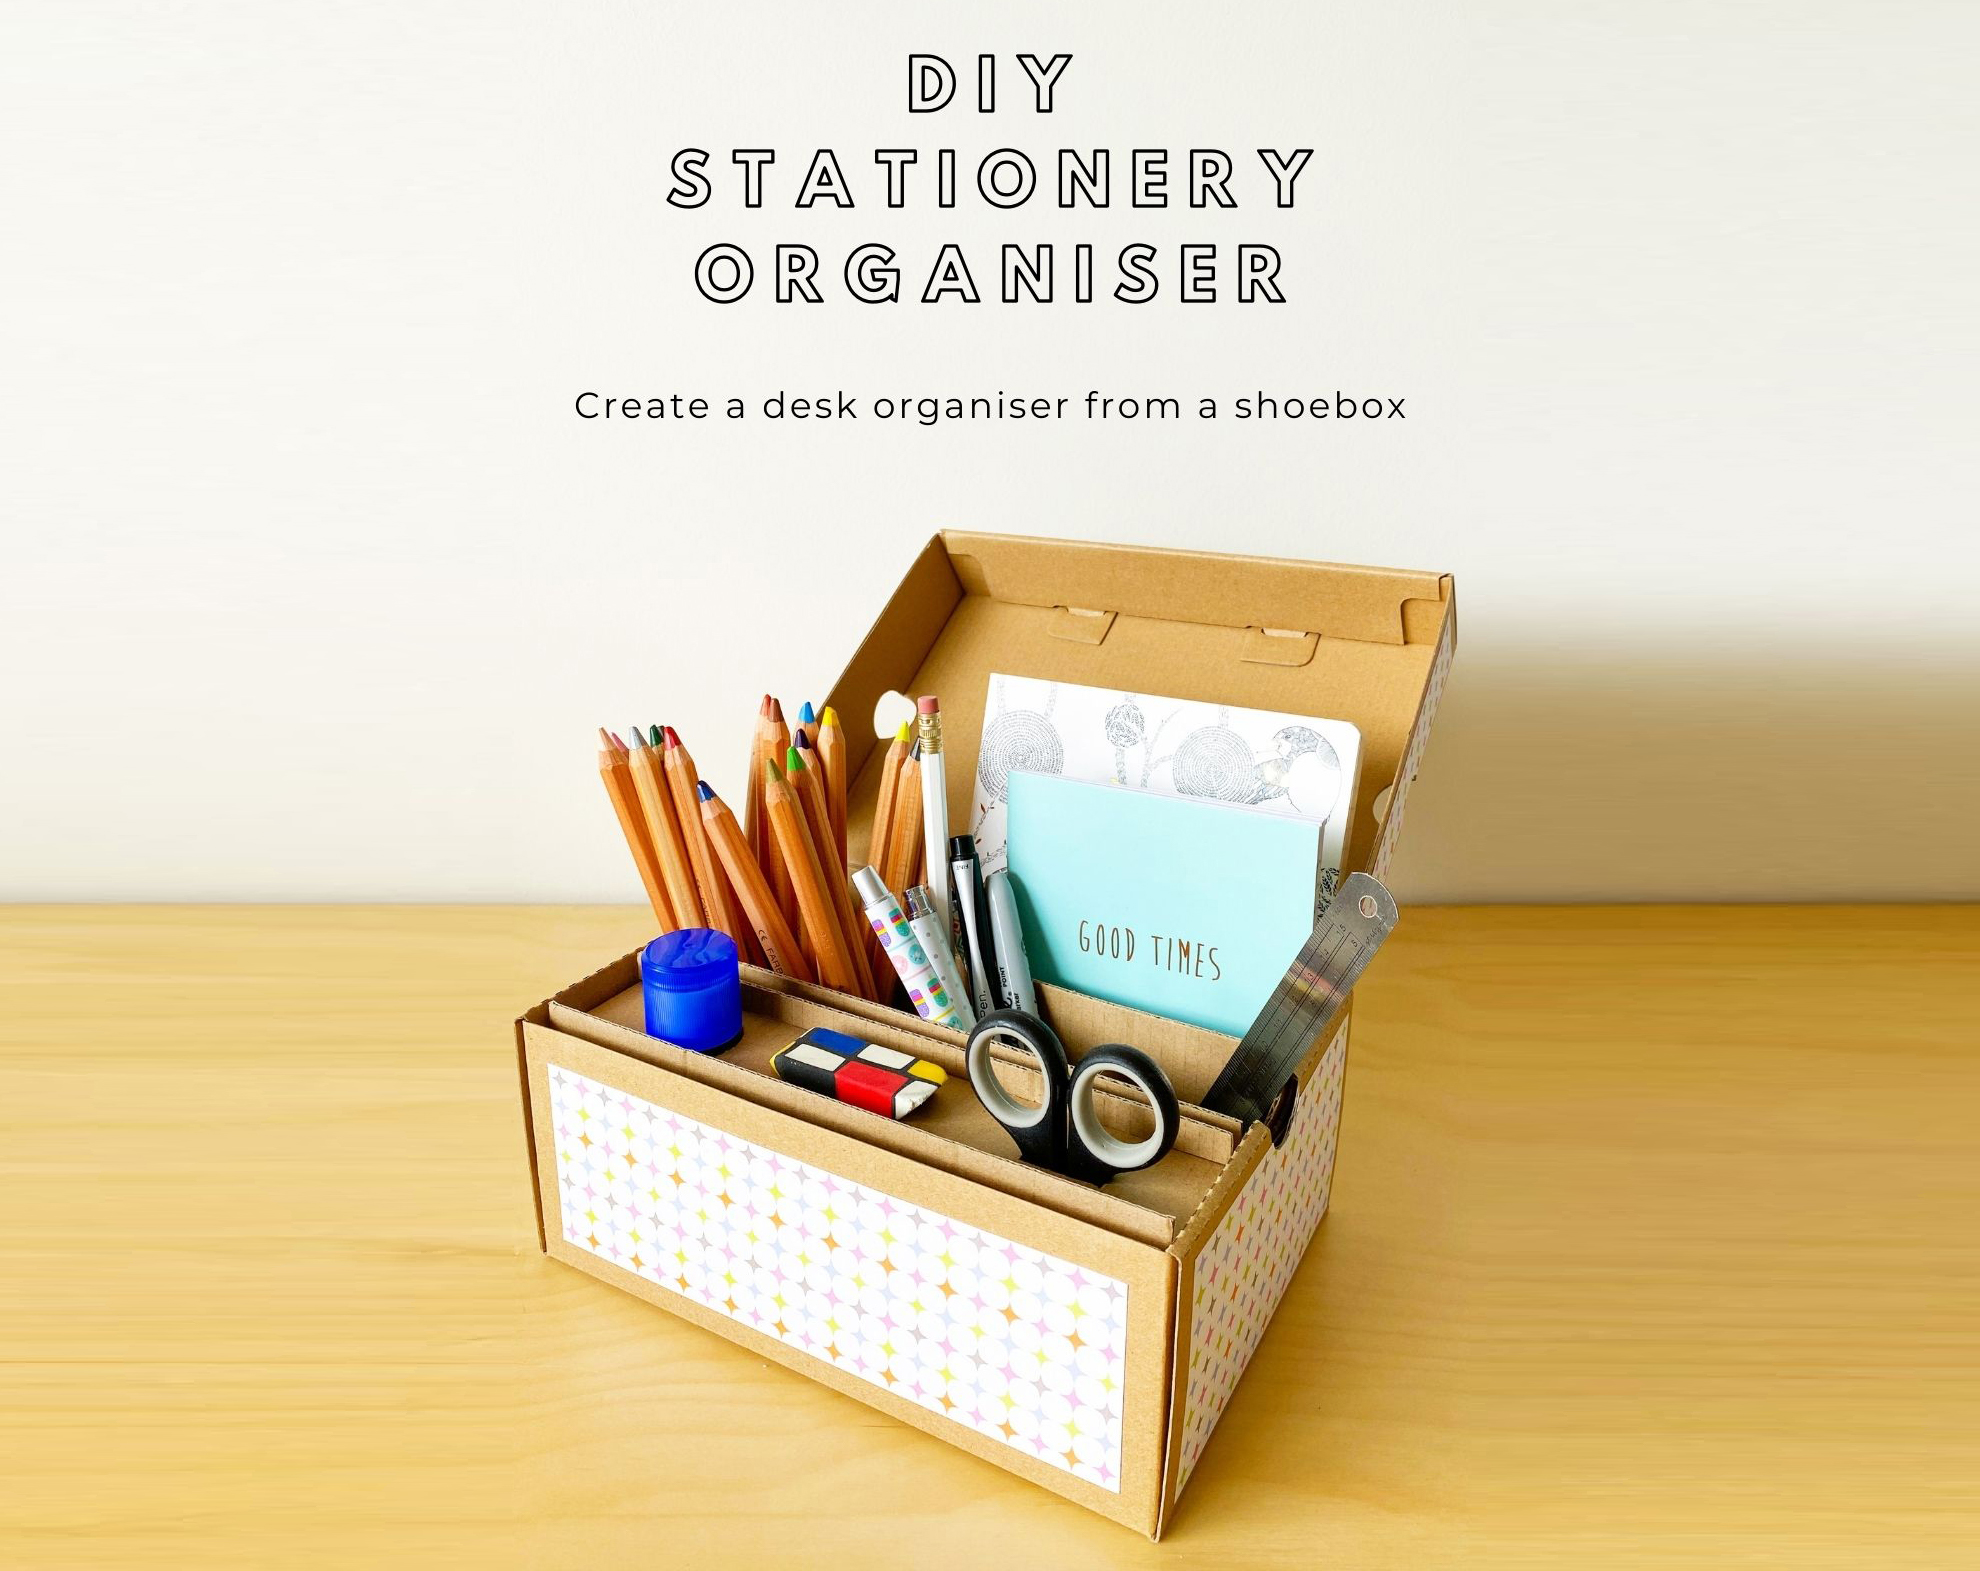
How to Make a DIY Stationary Organiser
Jan 05, 2021
DIY Stationary Organiser by Jana (@playroomstories)
The last month of school holidays has started and while the kids are still enjoying their holidays, us parents have started to prep for the next school year, or in our case, the first year of school. As school shoes are one of the most important pieces of clothing for children, you want to make sure they are great quality, support growing feet and last a long time. Ascent school shoes tick all those boxes and even the shoebox the shoes come in is nice and sturdy and perfect for a recycle and play project.
Hi, I’m Jana and a Mum of two boys. I love crafting, DIYs and setting up fun activities for my boys to keep them busy and entertained. I love sharing our play adventures on my Instagram account @playroomstories . I often use recyclables for our activities and turn them into fun toys for my boys.
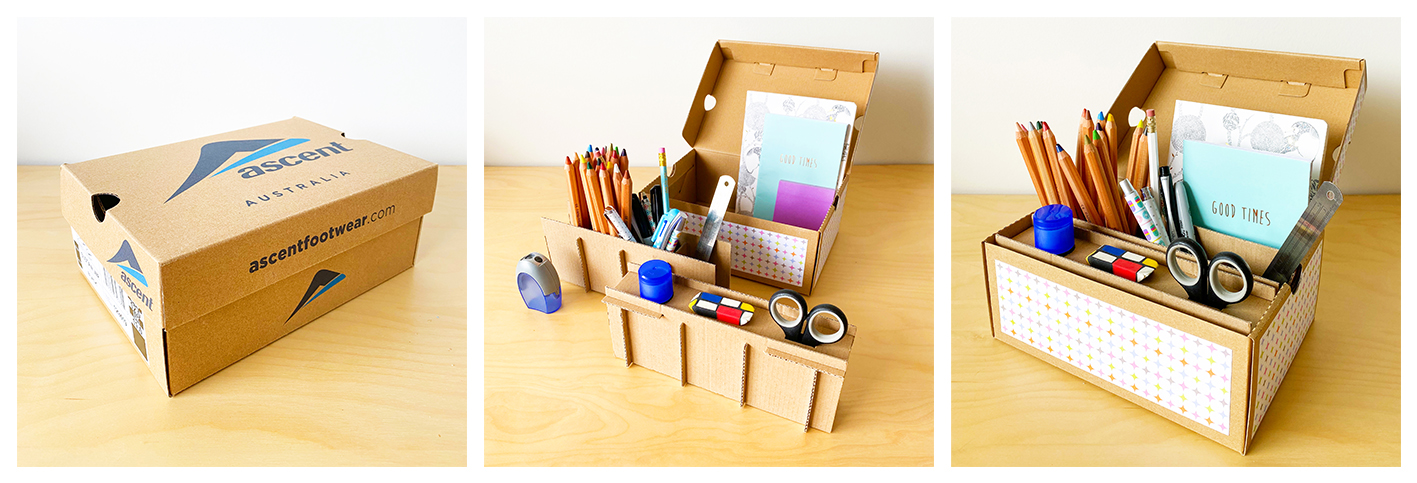
When Ascent Footwear asked me to repurpose one of Ascent Footwear shoeboxes, lots of ideas popped into my head. I decided to turn the shoebox into a “DIY Stationery Organiser”. You or your child can store your important stationery in it and it can also be easily disassembled to store all the components inside the shoebox to make it a travel stationery box for when you go on holidays. The DIY stationery organiser contains two inserts: one for pens and pencils and one for glue, scissors and a place to keep an eraser. And there’s still plenty of space in the back for storing notebooks, post-it notes and other important bits and pieces. If you’d like to recreate this DIY stationery organiser, follow the instructions below.
What you will need:
Shoebox
Cardboard (ours is 1.5mm thick)
Box Cutter or Craft Knife
Steel Ruler
Cutting Mat
Pencil
PVA glue
Optional:
Glue Stick
Scrapbooking paper, washing paper, paint, stickers to decorate
Mod Podge for sealing and extra protection
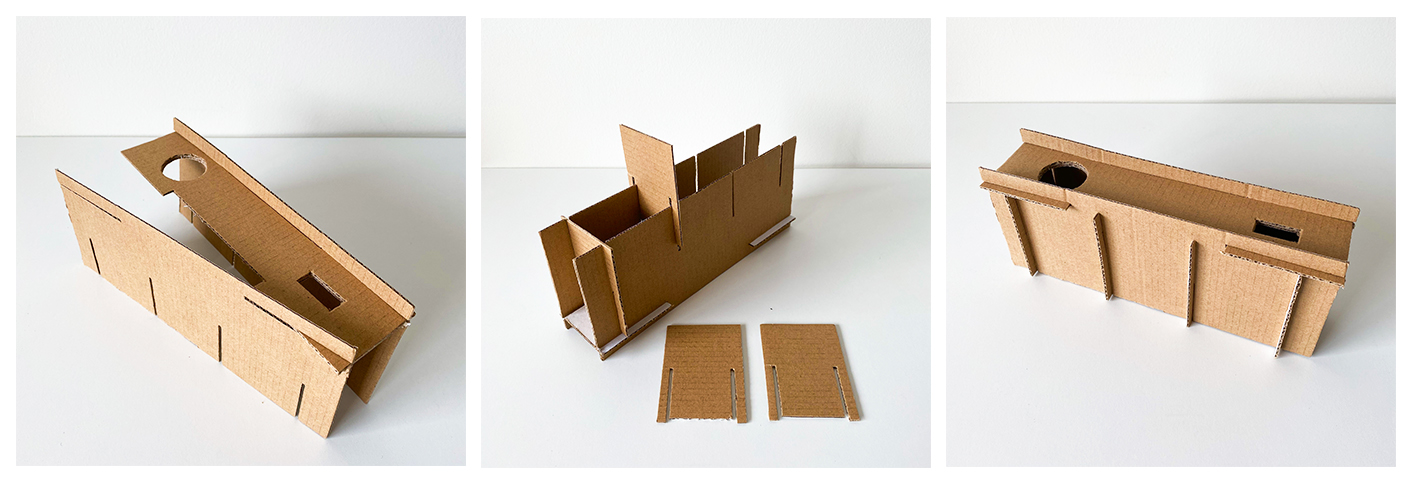
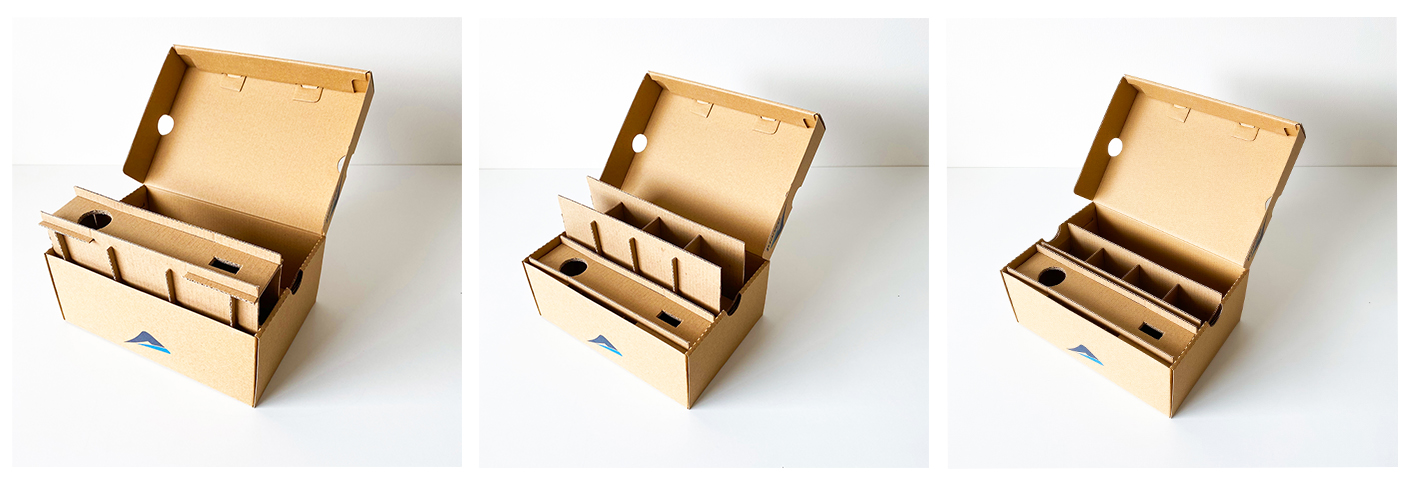
Step 1: Creating the glue and scissors holder
Measure the insides of your shoebox.
This will determine the width of your inserts. In order to be able to place the inserts into the shoebox easily deduct two millimetres off your measurements.
In our case, the inside measured 22.5cm so the width of each of the inserts is 22.3cm.
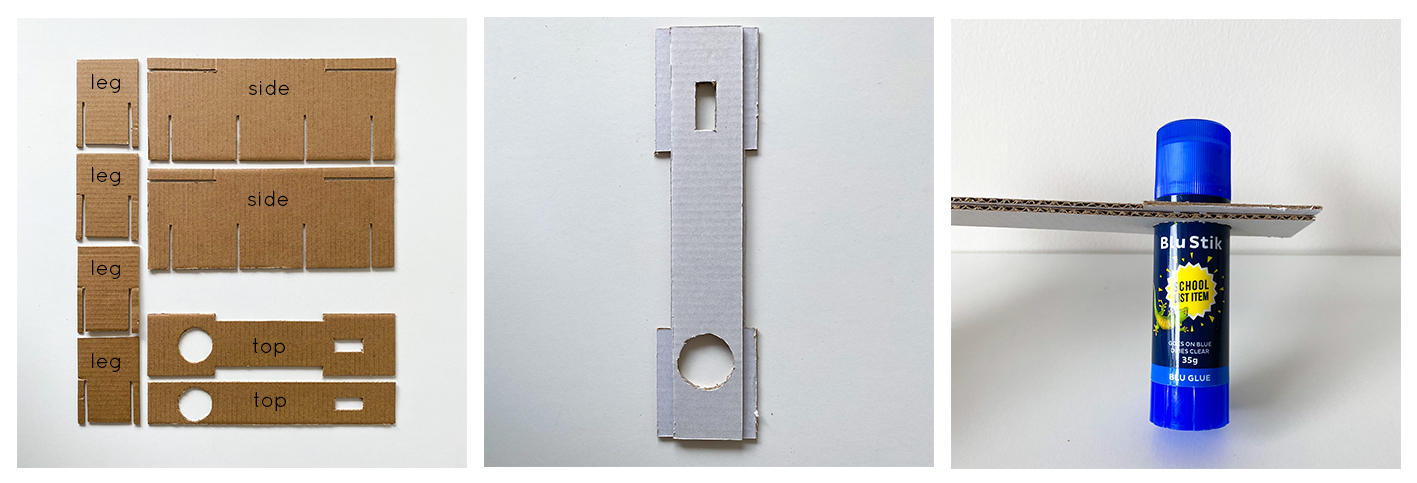
This glue and scissors holder inserts consist of eight parts in total - seven parts which slot into each other and one part which I glued underneath the top for extra stability.
The slot cutouts are 2mm wide to allow the cardboard parts to slide into each other easily but don’t allow any wiggle room.
Measurements:
Top: 22.3cm x 5.5cm with an extra cut out in the middle measuring 9.7cm x 0.8cm. When adding the holes for the glue and scissors make sure they don’t align with the slots for the four-leg parts. The additional support part is 22.3 cm x 3.8cm. When glueing the two parts together, pop your glue stick in to make sure the two parts are centred.
Sides: 22.3 cm x 9cm with two slots on each side that run parallel to the longest part and are positioned 1cm away from the edges measuring 6.3cm x 0.2cm (thickness of your cardboard) for the top and four slots running perpendicular to the longest side measuring 4cm x 0.2cm. The distances between the three slots are 5.8cm in the middle and 2cm at each end.
Legs: 7.8cm x 5.5cm with two slots positioned 0.7cm away from the edges measuring 4cm x 0.2cm (thickness of your cardboard). In order to allow room for the extra top part, you have to cut off an extra 0.2cm from the part in the middle between the two slots.
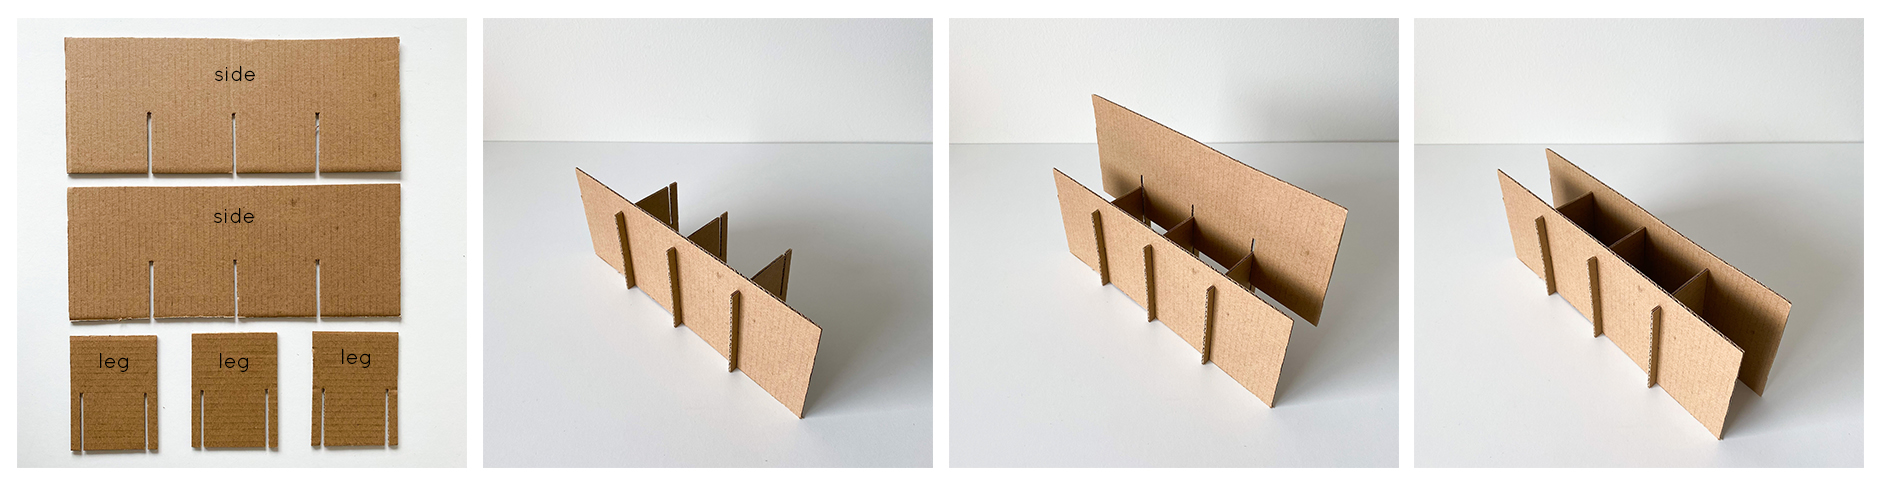
Step 2: Creating the pen holder
The pen holder insert consists of five parts that slot into each other.
The slot cutouts are 2mm wide to allow the cardboard parts to slide into each other easily but don’t allow any wiggle room.
Measurements:
Sides: 22.3 cm x 9cm with three slots running perpendicular to the longest side measuring 4cm x 0.2cm. The distances between the three slots and the edges are 5.4cm.
Legs: 7.8cm x 5.8cm with two slots positioned 0.7cm away from the edges measuring 4cm x 0.2cm (thickness of your cardboard).
Step 3: Assembly
Carefully slide both inserts into the shoebox.
You will notice a little bit of resistance but that’s ok. It means that your inserts are nice and snug and will stay in place.
Add all your stationery.
You will also notice that there is some space in the back which is for small notebooks, post-it notes or other larger pieces that don’t fit into the inserts.
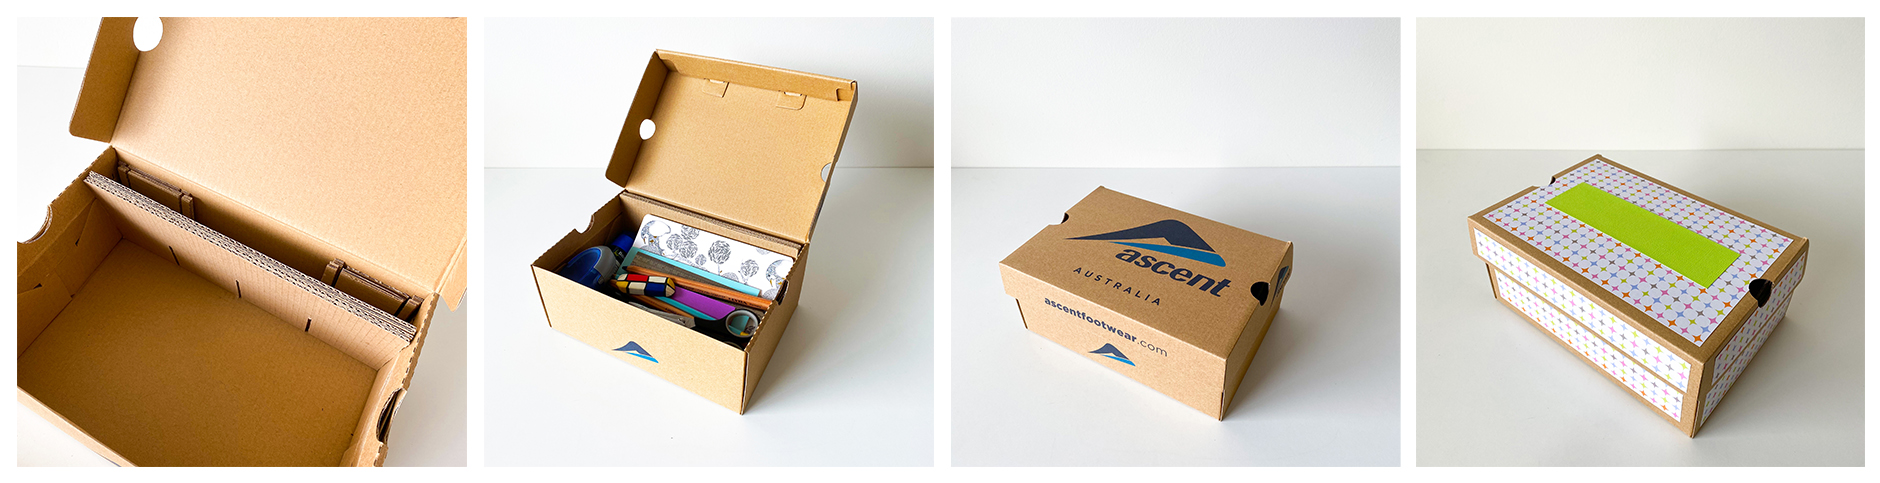
Step 4 (optional): Pack & Decorate
This is the fun part that you can do by yourself and ask your children to do.
Collect bits and pieces to decorate and personalise your shoebox organiser.
Use pretty scrapbooking paper, paint, washi tape, stickers or whatever else you have at home.
Make sure you don’t add to much extra material to the areas that the lid of your shoebox covers so you can still close it if you want to be able to pack it up.
Step 5 (optional):
The reason why I avoided gluing the parts of the inserts together is that I wanted to be able to pack up the DIY stationery organiser and take it with us when we go away.
If you’d like to do that as well, carefully take apart the insert and place them at the back of the shoebox with the largest parts at the front and the legs in the back so they won’t get damaged.
Put all the pens and pencils and all the other stationery inside and close the shoebox.
If you’re worried that the shoebox will open, you can tie a piece of string or rubber band around it to keep it closed.
Thank you very much Ascent Footwear for inviting me to create this fun ‘Back to school’ project for you and I hope you enjoyed our DIY shoebox organiser.
If you have any questions about this project, please send me a message via our Instagram account @playroomstories where we share lots of fun activities and DIYs.
I’m wishing your children a great start to the new school year and all of you a happy and healthy 2021.
Happy crafting and playing,
Jana
Behind The Groove Range Feb 27, 2026
The Benefits of our Diamond Grip Outsole Jan 28, 2026
Supportive School Shoes For Every Child Jan 21, 2026
Your Helpful Checklist For Back To School When It Comes To Shoes Jan 14, 2026
Understanding Foot Growth and Shoe Wear in the First School Year Jan 09, 2026
A Podiatrist's Perspective & a Parent's New Chapter Nov 21, 2025
Why Supportive Sandals Matter More Than You Think Oct 13, 2025
National Podiatry Week Spotlight: Neda From Podiatry Beyond Shares Why She Recommends Ascent Oct 08, 2025
Why The Right Shoes Matter For Comfort & Safety Aug 20, 2025
The Perfect Pair for Dad, This Father’s Day
